Lab 7 - Messaging
 |
In this lab you will add an ActiveMQ component to receive messages through the MoM Broker JBoss A-MQ. Using the JMS component you could connect to any JMS compliant MoM Broker. |
|---|---|
 |
Red Hat JBoss A-MQ, based on Apache ActiveMQ, is a JMS 1.1-compliant messaging system. It consists of a broker and client-side libraries that enable remote communication among distributed client applications. JBoss A-MQ provides numerous connectivity options and can communicate with a wide variety of non-JMS clients through its support of the OpenWire and STOMP wire protocols.It provides enterprise features like High Availability, Scalability, Reliability, Security, High Performance,etc. (https://access.redhat.com/documentation/en-US/Red_Hat_JBoss_A-MQ/6.2/html/Product_Introduction/FuseMBIntroWhatIsMB.html ) |
|---|---|
- Select File -> Import.. and select General -> Existing Project into Workspace
- Click on Select archive file and browse to ~/FuseWorkshop/support/Lab7, and select Lab7.zip
- Click Finish.
- Double-click on the blueprint.xml file under Camel Contexts.
- Click on the Source tab.
- Copy and paste the following xml lines before <camelContext>
| <bean id="activemq" class="org.apache.activemq.camel.component.ActiveMQComponent"> |
|---|
|
The activemq bean describes the ActiveMQ connection configuration: url, user and password. |
|---|---|
- Save the file (Ctrl+S).
- Click on the Design tab.
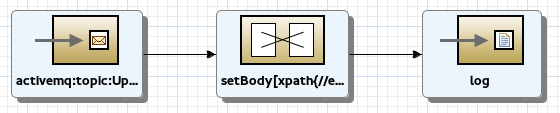
Add an ActiveMQ component from the Components palette.
Edit its properties:
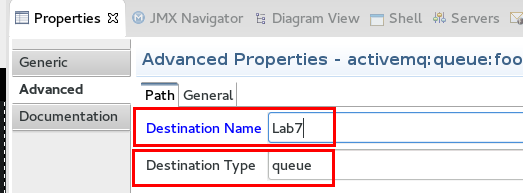
Advanced -> Path -> Destination Name: Lab7
- Advanced -> Path -> Destination Type: queue
Add a Split component from the Routing palette.
Edit its properties:
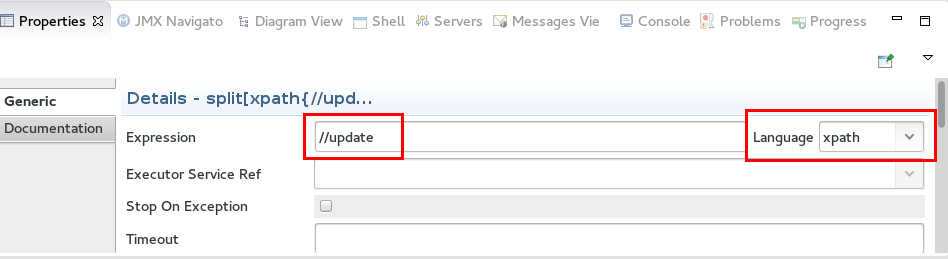
Expression: //update
- Lanugage: xpath
Add a setProperty Component from the Transformation palette.
Edit its properties:
Property Name: entity
- Expression: //entity/text()
Language: xpath
Link ActiveMQ to Split.
Link Split to setProperty.
Add a RecipientList from the Routing palette.
Edit its properties:
Expression: activemq:topic:Updates.${property.entity}
Link setProperty to recipientList.
- Save the file (Ctrl+S).

|
A recipient list, is a type of router that sends each incoming message to multiple different destinations. In addition, a recipient list typically requires that the list of recipients be calculated at run time. |
|---|---|
- Click in any empty space in the route diagram.
- Click on the properties tab.
- Enter “mainRoute” as the ID.

- Click on the Routes menu, and select Add Route.
Add an ActiveMQ component from the Components palette.
Edit its properties:
Advanced -> Path -> Destination Name: Updates.Customer
- Advanced -> Path -> Destination Type: topic

Add a setBody component from the Transformatoin palette.
Edit its properties:
Expression: //entityID/text()
- Language: xpath

Add a Log component from the Components palette.
Edit its properties:
Message: Received an update for Customer ID: ${body}
Link ActiveMQ to setBody.
- Link setBody to Log.
- Save the file (Ctrl+S).
- Click in any empty space in the route diagram.
- Click on the properties tab.
- Enter “CustomerRoute” as the ID.
- Save the file (Ctrl+S).
- Click on the Routes menu, and select Add Route.
Add an ActiveMQ component from the Components palette.
Edit its properties:
Advanced -> Path -> Destination Name: Updates.Product
- Advanced -> Path -> Destination Type: topic

Add a setBody component from the Transformation palette.
Edit its properties:
Expression: //entityID/text()
- Language: xpath
Add a Log component from the Components palette.
Edit its properties:
Message: Received an update for Product ID: ${body}
Link ActiveMQ to setBody.
- Link setBody to Log.
- Save the file (Ctrl+S).
- Click in any empty space in the route diagram.
- Click on the properties tab.
- Enter “ProductRoute” as the ID.
- Save the file (Ctrl+S).
- If JBoss Fuse Server is not running, start it by clicking

- Open a web browser, and go to http://localhost:8181
- Login as admin/admin
- Click on the ActiveMQ tab.

- Click on the amq broker.
- Click on

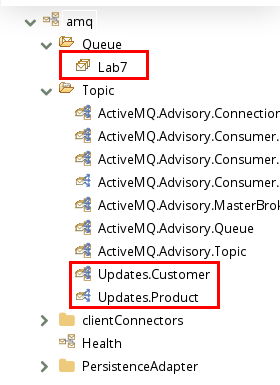
- Enter “Lab7” as the Queue Name and click Create Queue
- Enter “Updates.Customer”, select “Topic” and click Create Topic
- Enter “Updates.Product”, select “Topic” and click Create Topic
- Go back to JBDS.
- Right-Click on the JBoss Fuse Server and select Add and Remove
- Select Lab7 project, click Add and Finish
- Go back to the web browser.
- Expand the Queue folder and click on the Lab7 queue.
- Click on

- Open ~/FuseWorkshop/support/Lab7/Message.xml with any text editor (llike gedit or vi)
- Copy its contents and paste them into the payload box.
- Click on the Send Message button.

- Click on the Logs tab and verify there’s a log message per each element in the XML message.

- Go back to JBDS.
- Right-click on Lab7 under JBoss Fuse Server and select Remove.