Lab 5 - SOAP Web Services
 |
In this lab you will create a SOAP web service that exposes two operations, using CXF (https://access.redhat.com/documentation/en-US/Red_Hat_JBoss_Fuse/6.2.1/html/Apache_Camel_Component_Reference/IDU-CXF.html ) |
|---|---|
 |
Apache CXF is an open source services framework. CXF helps you build and develop services using frontend programming APIs, like JAX-WS and JAX-RS. These services can speak a variety of protocols such as SOAP, XML/HTTP, RESTful HTTP, or CORBA and work over a variety of transports such as HTTP, JMS or JBI. (https://access.redhat.com/documentation/en-US/Red_Hat_JBoss_Fuse/6.2.1/html/Apache_CXF_Development_Guide/index.html ) |
|---|---|
- Select File->Import.
- Select General -> Existing Project into Workspace.
- Select “archive file”.
- Browse to ~/FuseWorkshop/support/Lab5/Lab5.zip
- Click Finish.
- Right-click in the src/main/resources folder and select New -> Other
- Select General -> Folder, click Next.
- Enter wsdl as its name and click Finish.
- Right-click in the wsdl folder and select Import
- Select General -> File System and click Next.
- Browse to ~/FuseWorkshop/support/Lab5 and select JBossBankServices.wsdl
- Select menu Run -> External Tools -> WSDL2Java
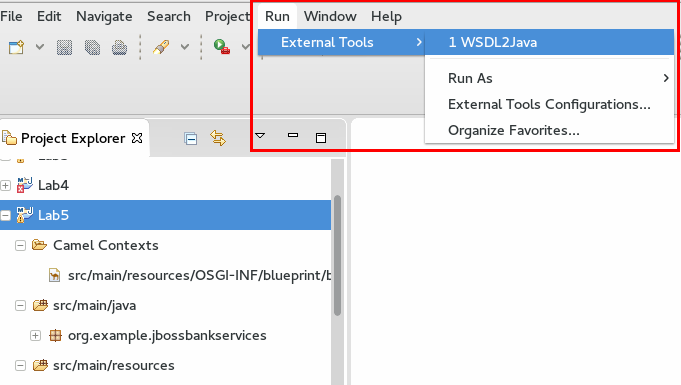
|
This CXF plugin will generate a group of Java classes that represent a skeleton to implement the web service described by a WSDL file. |
|---|---|
- Review the generated Java classes under the org.example.jbossbankservices package.
- Double-click on the blueprint.xml file to open it in the editor.
- Click on the Source tab.
- Copy and Paste the following xml lines before the <camelContext>:
| <cxf:cxfEndpoint id="ws" address="/JBService" serviceClass="org.example.jbossbankservices.JBossBankServices"/> |
|---|
|
The first line describes a CXF Endpoint which is associated with the main Java class created by the CXF plugin from the WSDL file. This means that the endpoint will implement the web service described in that file. |
|---|---|
- Save the file (Ctrl+S).
- Click on the Design tab.
- Add a CXF component from the Components palette.
- Edit its properties and modify the url to: cxf:bean:ws

- Add a Choice component from the Routing palette.
- Add two When components from the Routing palette.
- Link CXF to Choice.
- Link Choice to the first When.
- Link Choice to the second When.
Edit the first When properties:
${header.operationName} == ‘getCustomerAccounts’
Edit the second When properties:
${header.operationName} == ‘getAccountBalance’

- Save the file (Ctrl+S).
|
The SOAP operation name of the incoming web service request is parsed by CXF and placed in a header called “operationName”. |
|---|---|
- Add a SQL component from the Components palette.
Edit its properties:
Advanced -> Path -> Query: select * from accounts
- Advanced -> General -> Data Source: JBossBankDB
- Advanced -> General -> Output Class: org.example.jbossbankservices.Account

|
The SQL component allows you to work with databases using JDBC queries. Unlike the JDBC component ,this component uses spring-jdbc behind the scenes for the actual SQL handling. |
|---|---|
- Add a Bean component from the Components palette.
Edit its properties:
Method: setAccount({$body})
Bean Type: org.example.jbossbankservices.Accounts
LInk the first When to the SQL component.
- Link the SQL component to the Bean component.
- Save the file (Ctrl+S).

|
The bean component binds beans to Apache Camel message exchanges. IT allows you to call methods from or instantiate Java beans. |
|---|---|
- Go to the org.example.jbossbankservices package under src/main/java and open Accounts.java
- Go to the end of the file and add the following method:
| public Accounts setAccount(List<Account> accounts){ |
|---|
- Save the file (Ctrl+S) and close it.

- Add another SQL component from the Components palette.
Edit its properties:
Advanced -> Path -> Query: select * from accounts where accountid=:#${body[0]}
- Advanced -> General -> Data Source: JBossBankDB
- Advanced -> General -> Output Class: org.example.jbossbankservices.Account
- Advanced -> General -> Output Type: SelectOne
|
In this case we selected “SelectOne” because we expect only one row coming back from the DB. |
|---|---|
- Add a setBody component from the Transformation palette.
Edit its properties:
Expression: ${body.getAccountBalance()}
LInk the second When to the second SQL component.
- Link the second SQL component to the setBody component.
- Save the file (Ctrl+S).

- Go to the Servers tab and start the JBoss Fuse server (
 )
) - Right-click on the JBoss Fuse server and click on Add and Remove..

- Select Lab5 and click on the Add button.
- Click Finish.

|
Now you will test the two operations of the generated web service using an open source tool called SoapUI (https://www.soapui.org ) |
|---|---|
- Start SoapUI by clicking on the icon in the desktop.
- Click on the SOAP button

- Enter Lab5 as the Project Name.
- Enter http://localhost:8181/cxf/JBService?wsdl as the Initial WSDL.
- Click OK.

- Double-click on the Request1 under the getAccountBalance operation.
- Replace the “?” in accountID with a “111”.

- Test the webservice by clicking on the submit request button

- Double-click on the Request1 under the getAccounts operation.
- Replace the “?” in customerID with a “1”.
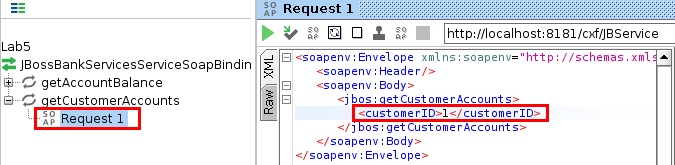
- Test the webservice by clicking on the submit request button
- Close SoapUI.
- If both tests were successful, go back to JBDS.
- Close all the open files.
- Right-click on the Lab5 deployment under JBoss Fuse Server, and select Remove.